This section is for advanced setup only.
Normally, you will install FinJinni and SQL Server Express on the same workstation that you are using it from.
For multi-user versions of FinJinni, users need to access the database over your network. For large installations, you can purchases a licensed version of SQL Server from Microsoft. For installation on shared workstations and smaller servers, SQL Server Express can still be used.
By default, SQL Server Express only allows access from the machine on which it is installed. You can run SQL Server Express in a network configuration by updating a few settings.
FinJinni will do this setup automatically for you if it installs SQL Server as described in the previous section.
In all cases, you will also need to insure that your Windows Firewall is set to allow access from other PC’s on the network. That is described in a following section “Open the Firewall”.
Automatic Setup for SQL Server Network Access
If you did not select sharing when you installed FinJinni, or if you installed SQL Server independently, you can still use FinJinni’s automatic network configuration: Look for the shortcut “Setup SQL Server Express Sharing” in the GypsyBI folder on the Start menu. Use “Run as Administrator” to let FinJinni perform the setup.
You will then need to insure that the SQL Server security authentication mode is set to “mixed mode”, which allows a SQL username and password to be used by other FinJinni users. Normally, you would select this during SQL installation. You can do this at a later time by following these steps:
- Open SQL Server Management Studio.
- In the Object Explorer (the left pane), right-click the server, and then click Properties.
- On the Security page, under Server authentication, select “SQL Server and Windows Authentication mode”, and then click OK.
- Click OK to acknowledge the requirement to restart SQL Server.
- If you need to enable the “sa” administrative login by using Management Studio:
- In the Object Explorer, expand Security, expand Logins, right-click “sa”, and then click Properties.
- On the General page, create and confirm a new password for the sa login.
- On the Status page, in the Login section, click Enabled, and then click OK.
Manual Setup for SQL Server Network Access
Skip this section if you used FinJinni to configure SQL Server shared access.
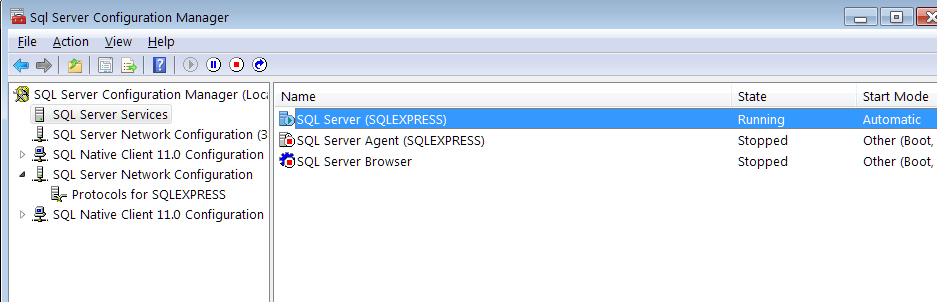
You will need to run the SQL Server Configuration Manager tool, which is installed with SQL Server Express. There is usually a start menu shortcut for this tool. If you do not have a shortcut to it on your start menu, run this command to start it:
C:\windows\SysWOW64\SQLServerManager13.msc
The “13” indicates SQL Server 2016 and will be a different number for other SQL Server versions. Use whichever version is installed.
Here is the main screen you will see. You will need to expand “SQL Server Network Configuration” by clicking on the arrow to the left of that line.
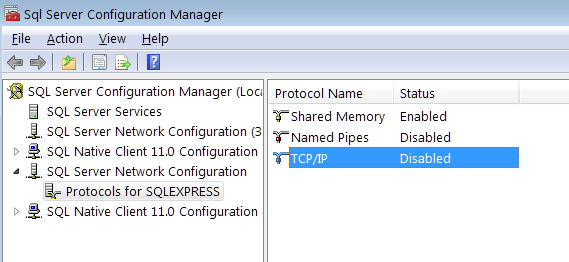
Double-click on TCP/IP to bring up the properties. Then set it to enabled:
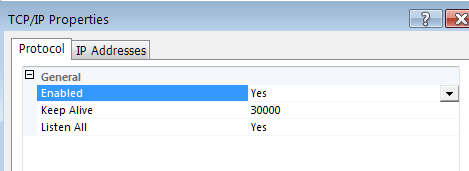
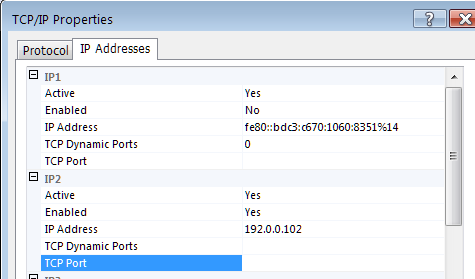
Next, use the IP Addresses tab to set up the port SQL Server will use. Scroll down to the IP address for your local network, IP2 in this example. Change Enabled to Yes, TCP Dynamic Ports to blank, and TCP Port to blank.
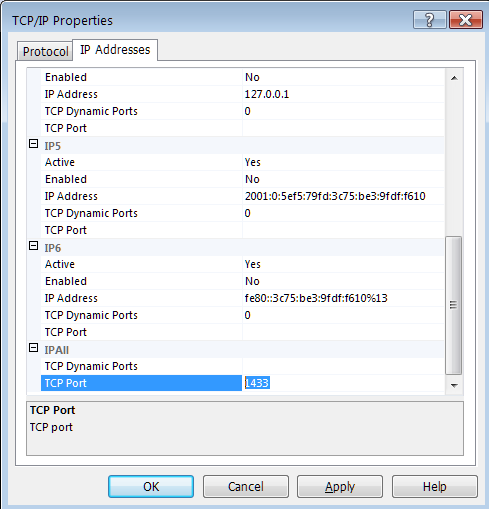
Now scroll down to the end of the list where it shows IPAll. Change TCP Dynamic Ports to blank and TCP Port to “1433”. Then click OK.
Now you will need to restart SQL Server. Select SQL Server Services on the left, right click on SQL Server (SQLEXPRESS) and choose Restart.
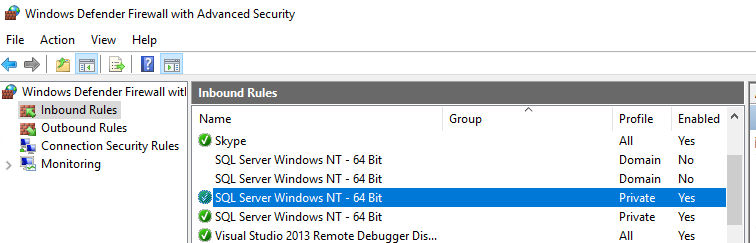
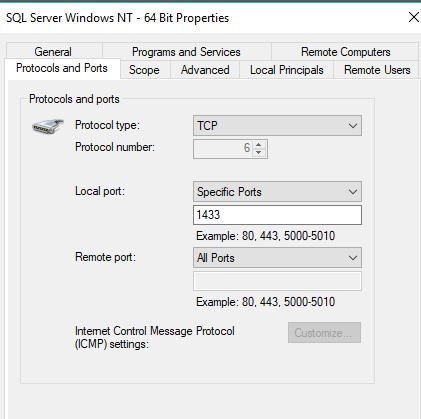
Open the Firewall
If you are using a firewall such as Windows Defender, you will also need to allow connections on port 1433. Here are the Advanced Settings for Windows Defender: